- This topic has 13 replies, 6 voices, and was last updated 7 years, 10 months ago by
 Ragùneraxe.
-
Varimathras
 Heroic
Varimathras is the Patchwerk of this tier. Single room, single boss, single phase and very simple mechanics. Key to killing (or failing) this is doing movement perfectly, and the movement, stacking and spreading are kinda similar to endboss of Darkheart Thicket (Shade of Xavius).
Misery and Alone in the Darkness are two abilities that tie into everything else happening on this fight and everybody needs to understand these for successful kill.
Misery is a 7 second debuff that player gets whenever taking shadow damage. Misery prevents all healing effects and increases physical damage taken by 200% (forcing a tank swap). Almost all damage in this fight is shadow based and while most of it is avoidable, this healing prevention will affect everybody in the raid. Absorb shields and Spirit Link Totem can be used to save people who have Misery, making disc priest and resto shaman great healers on this fight.
Alone in the Darkness does 1.5M shadow damage (and therefore applies Misery) on anybody who is more than 8 yards away from anybody else, ie. alone.
Torments of Shivarra does steady fire damage to whole raid from start to finish, and it can get tricky at times if healing is not possible because of Misery. After 6 minutes this changes to shadow damage meaning everybody gets Misery and will die in few seconds making it hard enrage that can be delayed a bit with damage prevention cooldowns.
In Heroic mode Torment of Frost is added into the fight after 2 minutes. Raid will take steady frost damage which also applies 40% slow debuff making abilities that require movement bit harder to execute. After another 2 minutes Torment of Fel is added for the last two minutes of the fight before enrage. Torment of Fel starts with low damage but it increases by 50% with every tick making the end of the fight require healing cooldown rotation.
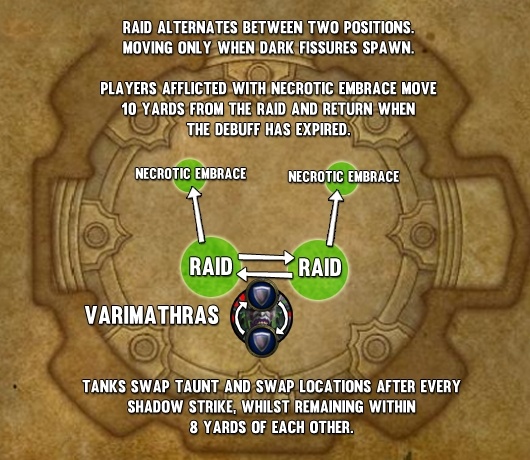
Shadow Strike is the tank swap mechanic. When boss hits 100 energy it does 5M shadow damage (applying Misery) in front cone so tank should be alone in front of the boss… But never more than 8y away from somebody else.
Dark Fissures will appear under three players on a timer, staggered and short time between them. Raid needs to be stacked on a marker, and move as a group to another marker when the Dark Fissures is cast. These will of course do shadow damamge if people linger in the circles, dishing out even more Misery.
Marked Prey does not overlap with Dark Fissures. One random non-tank gets marked as target with big purple arrow on the floor pointing at you. Shadow version of the boss charges at the target and knocks back whoever is hit first dealing 1.5M shadow damage (again applying misery). Classes that are immune or can handle knockbacks well (rogue, DH, warr) should soak these, or alternative way is for the raid to stand in line (like soaking the beams on KJ) and whoever’s hit first gets knocked back somewhere in the line instead of alone far behind the others.
Necrotic Embrace is new ability in heroic mode. Random non-tank gets 6 second debuff and when it expires you get 1.5M shadow damage (again applying misery) and it will jump to everybody within 10y of you. Whoever gets the plague needs to move over 10y from everybody else getting both Alone in the Darkness and Misery, and for that reason needs to be topped off before running out or will most likely die in later phases of the fight.
Group placement stolen from WoWHead’s guide.

-
Mythic changes
The two changes are:
- Necrotic Embrace hits two people at the same time instead of just one.
- Every time somebody gets Alone in the Darkness debuff a shadowy copy of Varimathras will spawn in that location.
Recommended strategy is using three tanks. Two do whatever they do in heroic, and third is helping with Necrotic Embrace. Third tank is preferably a warrior or a monk for instant movement out of raid. Typical four healers, but a disc priest with Clarity of Will is recommended for handling Misery and even alt or offspec can do it in a pinch. Without disc priest healers need to use whatever absorption tricks they have, probably best would be trinkets that give shield on demand.
Whole fight revolves around proper movement and stacking around few markers, and switching to the shadowy add when it spawns. Positions are slightly different from normal and heroic modes again.

Raid stacks on red and blue markers, switching between the two just like in normal and heroic modes.
When raid stacks on red side and two people get Necrotic Embrace both of them and the third tank assigned to soak NE’s move to blue marker together, then the two with NE debuff move to white and purple markers alone to explode with the NE. If people are positioned right none of the three will get Alone in the Darkness and the tank has now 2 stacks of NE. Then the two people who originally had NE go back to the raid together and the offtank will spawn the shadow add under him on blue marker.
Raid must switch to the add and nuke it down in 3 seconds (it has 30M health and it should be possible easily with instant nukes). While the raid nukes the add the tank with two NE debuffs runs out of the raid to explode, gets Alone in the Darkness and Misery which healers need to take care of.
Exactly same thing happens when raid is stacking on blue marker. The two NE victims + offtank move to red together, NE’s move to green and yellow, drop their debuff there to the tank, two people return, tank goes out to explode and spawns add on red, raid nukes add.
That is whole fight for about five minutes from pull to loot.
-
FatbossTV guide. Clarified the text above for recommended starting point.
-
Since the original FatbossTV guide on WoWHead and the video there’s surfaced much cleaner take on the same strategy that still depends on third tank soaking, but easier movement. Here’s a pretty paint doodle of the positioning.

- Black is for boss
- Raid stacks alternating between red and blue as usual
- Yellow is the place where the soaking tank and two people with Necrotic embrace runs, and purple and green are for the NE to blow up. DBM marks the two NE’s with purple and green by default. Distance between purple-yellow and green-yellow is less than 8 yards so that NE will jump and the NE’s do not get Misery, and distance from yellow to either red or blue is more than 10 yards. Adds will always spawn on yellow and ranged need to nuke those asap.
-
About healing CDs :
What i came up with is a bit tricky but i tried to do it as simple as possible, and try to make people use their CDs in a defined order as to sfex / hump / kodis / kraxx / shouts and after 2 minutes CDs. Between () the fight timeline after CD has been used …
- I’d just revival like 20 seconds into the fight to have it back early and be able to use it once or twice if we get past the 5 minutes duration mark. (20)
- Then Hump would use Tranquility at the 45 second mark (53-55)
- Then Kodis would use Aura (1:05)
- Then Kraax, starting with SLT, then HTT, then Ascendance, and finaly APT which could act as a 30 second long Shout and maybe saving one person from dying (2:30)
- At that point we are not far from having revival back, as soon as up i’d use it on CD
- Then, we’d make use of Shout(s), chaining them if we have two (3:05)
- After that, Kodis will use Avenging wrath, which lasts for 20 seconds (3:30)
- Kraax would then use ancestral guidance, 10 secs. (3:40)
- At this point Humps tranq should be soon back, as will aura just after, then Kraax CDs (but APT, 5 minutes CD), etc … and that should bring us till end of the fight.
We should not have long period of time without a healing CD of some sort up.
-
https://www.youtube.com/watch?v=yAUFWXUpuh8&t=111s
This is 3rd tank PoV, look at him placing add to the side
-
Here is a video of the same strat we have been doing, but showing some differences in the distance of the marks (travel time for 3rd tank) and also spawning the add in an easier place for ranged to handle.
We’ll be looking at implimenting these aspects even if we don’t currently have some of the classes they use on this fight.
-
This is 3rd tank PoV, look at him placing add to the side
The other video also positions adds similarly, but this one does seem to show a drop point that would be better for our melee heavy set-up. Drop the add close enough to the point we’re stacked on and it will get cleaved down by everyone with minimal switching.
-
Here is a video of the same strat we have been doing, but showing some differences in the distance of the marks (travel time for 3rd tank) and also spawning the add in an easier place for ranged to handle. We’ll be looking at implimenting these aspects even if we don’t currently have some of the classes they use on this fight.
they seem to spawn the add for marked prey too, so it must be intended
-
Everyone make sure to watch the Angered kill video as we will be adapting their approach to the Necrotic Embrace this weekend. It’s cleaner than ours and further from the raid, but not so drastically different that we have to re-learn the movements.
Here is a video of the same strat we have been doing, but showing some differences in the distance of the marks (travel time for 3rd tank) and also spawning the add in an easier place for ranged to handle. We’ll be looking at implimenting these aspects even if we don’t currently have some of the classes they use on this fight.
they seem to spawn the add for marked prey too, so it must be intended
Aye, we found that out right after raid and it was an oversight on my part. Missed the fact that Marked Prey spawned an add aswell, and the strat videos only made note of it in passing, and from the footage only the AitD add was ever shown being killed.
-
For healers/Warrior(s) we’ll be using this WA to ensure the CDs chain in a good manner. It displays a warning when you need to use your CD. Please take it and use it accordingly.
-
I recommend watching the replay of our best attempt on Varimathras on warcraft logs.
Here: https://www.warcraftlogs.com/reports/Tf8p9kxv14NWdbXh#fight=40&view=replay
You can clearly see the range of the debuffs for Necrotic Plague is very forgiving and how when we finally fail the mechanic in the frost phase it’s not only because of the slow but because Bosix and Zenna were too close to each other when running to yellow to be able to get far enough apart when they moved to their correct markers.
Of course, without the slow they’d have had the extra time, but this isn’t the point I’d like people to take away from this, which is instead that the range you guys have to keep the marks shared with one or both of the runners is large enough we don’t need to try and follow such a straight line to yellow putting ourselves at risk of a proximity timer fail and can head in a more triangular manner towards your colour from the start.
It also looks from the size of the debuff on Necro that he doesn’t need to run out as far as he does to trigger the add drop explosion and risk getting alone in the dark himself on the way back.
I may be missing something of course, but I thought I’d share as the replay feature makes things very clear, particularly if you play the Necrotic Plagues on 0.5 speed.
-
I run out further than necessary because there isn’t time to calculate the distance between me, the raid and tanks. Arriving at the feet of the boss in between the markers, I have approx 2-3 seconds to separate from everyone under Varim’s feet to spawn the add AND to run out with Necrotic and make sure Tanks don’t get it.
Running out this far won’t spawn a 2nd add so long as I return to the raid fast enough, which I manage to do now each time, barring the 1 or 2 initial fails with getting back too slow.
I’d rather go to the walls of the room and not spread Necrotic than play it safe and spread Necrotic to the tanks everytime. Something that happened on 3-4 tries because I didn’t have enough time to run out after spawning the add.
All in all, we made some very good progress on the fight and provided we can keep getting longer tries and practicing the later phases we may well kill this sooner than we think. It’s all about the movement and the add – nothing else to it, nail that and he’s dead. Key point is nailing it though, not an easy thing to do so we need to keep the focus up on this boss or we’ll revert back to wiping in the 1st minute of the fight again.
You must be logged in to reply to this topic.


