- This topic has 26 replies, 6 voices, and was last updated 7 years, 9 months ago by
 Scabbrox.
-
 JaahaGuild Member@jaahaMember since: 25/11/2017


Imonar the Soulhunter

Heroic
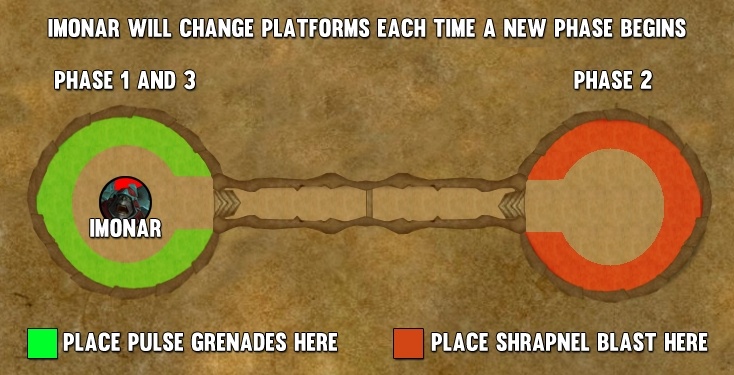
Two small circular platforms with long narrow corridor between them as an intermission phase of sorts.
1. Phase 1
- Shock Lance (Tanks)
- Pulse Grenade (Raid)
- Sleep Canister (Raid)
2. Intermission (60%)
- Conflagration + Statis Traps & Pulse Grenades drop on bridge
3. Phase 2
- Sever (Tanks)
- Shrapnel Blasts (Raid)
- Charged Blasts (Raid)
4. Intermission (30%)
- Conflagration + Old Statis Traps & Pulse Grenades + New Trip Wires & Shrapnel Blasts on bridge
5. Phase 3 – BL/TW Time
- Empowered Shock Lance (Tanks)
- Empowered Shrapnel Blasts
- Empowered Pulse Grenades
Phase 1
Shock Lance is the tank swap debuff here. Stacks 20 second debuff every five seconds, so swap at 4 stacks. Does about 5M physical damage, increasing 10% for each stack. Also random raid member gets hit for 1.5M nature damage, more people get hit with more stacks.
Pulse Grenades are things that go boom if you step on them and spawn under people. Move out and avoid. These do knockback when exploding and can chain through many explosions if unlucky.

Sleep Canister targets a random person that needs to react super fast to move out. The projectile will hit and sleep its target after a while, call for dispell with your name to dispell the sleep effect. Once you are dispelled, big gas aoe will sleep anyone around you.
Infernal Rockets is punishment for trying to be too clever. If you move out of the platform you get hit by 1million fire damage constantly and extra fire vulnerability for 30 seconds. Don’t be on the bridge.
Intermission
Conflagration is something boss channels at the other end of the platform during intermission phase. Raid needs to run through gauntlet of crap falling from the sky towards the other end of the platform. Use roar for movement speed and don’t touch anything that appears on the ground and you’ll be fine. Once Conflagration is interrupted next phase begins and Infernal Rockets will start raining down so don’t interrupt while some of the raid are still on the bridge or they may die. In addition heroicmode has stacking damage tick for whole raid while Conflagration is casting. Basically this works exactly like the phase 2 of Maiden of Vigilance.
Phase 2
Sever is new tank swap mechanic. Does 6.5M physical damage and dot. Lasts 18 seconds so taunt at 2 stacks and again when debuff has fallen off.
Shrapnel Blasts are other types of mines that look exactly like the ones in phase 1 but are red. Don’t step on these either. Does fire damage to whole raid and in addition physical damage to whoever stepped on one.
Charged Blasts targets two random people, first they see small red line coming from far off the platform at them, and after 7 seconds comes the big blast that does everybody in the line 2.5M fire damage and knocks off all except the initial target off the platform. Move to corners of the room in a way where the lines do not cross over whole platform to handle this.

Phase 3
Keep in mind that the mines left from Phase 1 will be still here. BL/TW as soon as the raid gets here and interrupts the Conflagrgation.
Empowered Shock Lance works same way as first phase, except the debuff never falls off and tanks eventually die. This works as soft enrage. Swap after 2-ish stacks to keep tanks more or less even so that their DPS stays up longer into the fight.
Empowered Pulse Grenade this gives 45 second debuff with the grenade hanging over few peoples’ heads. Anybody getting within 5y will take damage and be knocked back.
Empowered Shrapnel Blast Same as second phase, but stepping on one gives also endless dot.
-
JaahaGuild Member@jaahaMember since: 25/11/2017
Mythic changes
Fight is five phases each being 20% with the bridge intermissions in between and abilities are mixed and matched between all three heroic phases. Difficulty goes mainly up from the platforms and the intermission corridor getting cluttered by things that go boom.
Phase 1
Shock Lance, Sleep Canister, Empowered Pulse Grenade Phase 2
Sever, Charged Blasts, Shrapnel Blast Phase 3
Shock Lance, Sleep Canister, Empowered Pulse Grenade, Shrapnel Blast Phase 4
Sever, Empowered Shrapnel Blast, Charged Blasts, Sleep Canister Phase 5
Empowered Shock Lance, Empowered Pulse Grenade, Empowered Shrapnel Blast, Sleep Canister Never stand in or front of the bridge that crosses between the two platforms to avoid dropping any bombs there that will complicate crossing later. BL/TW in phase 3 or 4, depending on cooldown timing and what phase feels harder. Bridge is basically the same as heroic, except there’s also wind that pushes from the side. Warlock portals need to be used for bridge crossings.
Phase 1
Boss in the middle of the room, ranged spread around on the walls 10 yards apart to avoid sleep canisters. Melee will switch between boss’ left and right leg just like on Varimathras for example, switching side whenever sleep canister hits melee group. Sleeping person does not move, everybody else does.
Phase 2 and 4 (red)
Use only one side of the room for phase 2 and other side for phase 4. Whole raid stack right behind boss. All bombs spawn under raid, boss and raid moves few steps away as a group to stack bad shit as tightly as possible. Offtank can soak badly placed bombs if necessary. In phase 4 sleep canisters preferably run out of the group, but if they’re slowpokes then whole raid needs to move.
Phase 3 and 5 (green)
This phase is basically combination of the first two. Melee stacks just behind boss, run out (or whole group moves if necessary) from sleep canisters, stack the red bombs. Ranged spread on the walls and move when necessary to avoid red bombs but also making sure you wont block the bridge. Bridge access is no longer relevant in phase 5 so ranged can hang around there too.
Bridge 1 and 3 (green)
Class with damage immunity (hunter or pala) will clear path for the rest of the raid. Using warlock portals is handy since the traps will blow up under you but it saves a lot of time. When immunity runs out tank clears the rest. Healers need to run close behind to dispel the traps’ stuns from the minestompers. Low-ish damage, but lot of dispelling needed.
Bridge 2 and 4 (red)
Raid stacks up and heals to full before starting. Minestomper with speed boost and immunity (Blessing of Protection), preferably one of the tanks, runs to clear the traps including tripwires while healers use aoe cooldowns to keep the raid up. Big immobile cooldowns for first half of the bridge, smaller mobile cooldowns for second half while raid is moving. Trap clearer will die from dots that stacks from tripwires and we need to use one available ress (can be shaman ress totem) for this.
-
JaahaGuild Member@jaahaMember since: 25/11/2017
FatbossTV guide for mythic Imonar. Bit longer than early bosses but still important to watch before we get there. Watching this video is important to understand the placement better.
-
ScabbroxWarlord@scabbroxMember since: 05/11/2017


Next target after Hasabel.
As Hasabel is supposed to be easy when compared to some of the bosses we have killed, please ensure you’re read up on this as well.
-
JaahaGuild Member@jaahaMember since: 25/11/2017
Added written version of the FatbossTV video, but watching it is still highly recommended to understand the raid movement.
-
EpüFormer Member@epuratorMember since: 21/12/2017
Transition:
Demon Portal: Then BoP on tank who teleport then use Skytep ‘s potion and full clean a line
Raid pack on one point for healing then when clean is done use portal then a Roar / Wind’s totem.
2Nd Platform:
I have see a strat than all raid except the 2 ppl target by the beam are pack on a point aside the boss, then move other side of the boss when Mines are coming. Then the raid is going other boss’s side and the off tank cleaning the mine.
So boss do not need to move.
-
JaahaGuild Member@jaahaMember since: 25/11/2017
Transition:
2Nd Platform: I have see a strat than all raid except the 2 ppl target by the beam are pack on a point aside the boss, then move other side of the boss when Mines are coming. Then the raid is going other boss’s side and the off tank cleaning the mine. So boss do not need to move.
Fatboss video says basically the same, except they don’t bother clearing all mines. Just stack behind boss and move it slightly away after mines drop. Just like Felhounds’ fire debuff for example. They have whole group moving to minimize healing requirements and just ignore the mines if/when possible. This does require group stacking properly behind boss though, which we didn’t do sunday.
-
EpüFormer Member@epuratorMember since: 21/12/2017
Plateform 1
>Green Bridge ‘boss 14 stack” > We should clean both side of the bridge
Plateform 2
> Red Bridge ‘boss 10 stack” > Tank cleaner should Zig Zag and clean mostly all the bridge
Plateform 3
>Green Bridge ‘boss 20 stack”
Plateform 4
> Red Bridge ‘boss 12 stack” > Zig Zag clean done by a DH DD not the tank and sacrifice himself
Plateform 5I tried this boss with my other tank and we interrupt boss every time under 15 stack except the third time. So we kicked boss even when people still on the bridge.
We used 6 healer. More dispell / More heal
Demonist x 2 + Roar x2 Totem x2 are a must so Drood tank + Feral + Double cham in the composition.
-
EpüFormer Member@epuratorMember since: 21/12/2017
-
 FirefunkBlocked@firefunkMember since: 21/12/2017
Just a few comments from the two pulls we have had yesterday (and also inspired by the previous pull we had), maybe some insight for the next ones.
-I’ve seen a lot of videos where the boss was tanked just at start of the bridgeon 1st platform. I’m almost sure it’ll make crossing easier as people with pulse can not interfere with the main team’s crossing this way.
-I have seen people with empowered pulse grenade starting to try to cross the bridge as soon as possible. This should be avoided. Just stay left and right side of the 1st platform while the people who don’t have the grenades proceed.
-Everybody should have the “help dispell” weakaura that we’ll link next time we get there.
-We probably should use the 5th healer tactics. 4 could be enough but at some point during green bridges crossing we might need healing CD to make it smooth, and we need a lot to prepare for red bridges crossings so we might not have enough at one point or another. I’m unsure a 6th is really helpfull without more pulls, but i’m sure a 5th is important.
-I noticed my revival as a monk can be handy for green bridge crossing as it instantly dispells everybody hit, so maybe we could arrange something around this. All mistweaver monks i’ve seen in videos were using revival middle bridge for green crossing. We could use priest mass dispell maybe but it has cast time and needs zone targeting. Revival is use and forget.
-It’s important to clean most of the green bridge to ease crossing.
-For green crossing we could “split” the healing team so that nobody’s left behind, like we could have 3 different stages :
- Point A / start of the bridge : heal the pulse grenades while the team is crossing. Should be taken care of by either one designated healer, or the one(s) who has (have) empowered pulse grenade
- Point B / “middle of the bridge” : One designated healer could start crossing and stay around middle of the bridge to make the junction with the raid team ahead and the ones behind
- Point C / front of the bridge crossing : Some should be at front to ensure the team’s life is high enough
- Everytime the raid makes a step, the 3 healers can progress, from A to B, B to C, etc.
Maybe this way we don’t need healing CDs to cross green bridge (apart from probably revival). The healing team will need to adapt to whoever has empowered pulse grenade and who should cross asap, who should wait a little bit, etc. May cause dispell problems at front i’m not sure, but at front there should be the front healer(s) + the healer middle.
-I think it could be helpfull to make a “call” for the people with pulse grenade behind to tell them it’s now safe to cross. A lot of times during our previous tries, when i had pulse, i was trying to cross the bridge asap when i thought it was ok only to be confronted to people without debuff still waiting to cross or in the middle of the bridge waiting for i dunno what. Maybe we could not use a call and just a WA to track the boss stacks and say “ok now boss has X stacks, everybody needs to cross asap, we’ll interrupt at Y”.
-people should use a personal def CD for each red crossing while we clear the bridge. Should help keep people high enough for crossing + stay alive during stabilization when we all take position on the first platform.
Well, that’s enough for me for the moment.
-
ScabbroxWarlord@scabbroxMember since: 05/11/2017
Thanks Firefunk, all very good suggestions. If anyone sees any issue with them please speak up with why.
The 5th healer we also used on previous runs, even tried 6 but I agree 5 should be enough now, we all have more gear and higher ilevels than when we were last here so more HP.
If we can get past Hasabel without using Vantus next time these will also help here, though I’d rather ensure we get here earlier than wipe on Hasabel due to lacking runes so everyone will need to do their best to pull out some nice clean tries on Hasabel so we can kill her quickly, like yesterday.
Logically we can use Sellina as the 5th (priest) healer or alternatively Nirras if he’s available again as he was today, that or have Dan run as second resto as we did on many of our previous tries. That’s unless we find someone else in the meantime of course.
If Sam is able to make Sunday we could also then have a second BoP, assuming this helps avoid suiciding Bukav/Rita?
Humpback also had a suggestion on the second platform movement that might be worth trying to see if it is an improvement. I know that some of us have quite a few tries on this boss now already, but as many have few or none we’re basically in relearning phase so changes can be made at this point without any real issues.
It’s probably best he explains it but I know he’s not a fan of writing, so I’ll outline what I understand of it here. It involves basically using the two tanks on the second platform to clear the mines and not kiting the boss at all to increase uptime.
I think the Method video shows it best. From around 1:50.
I think it looks a lot cleaner personally, but I’d like Rag to look at it and see what he feels, but could be worth a try. Note also how cleanly they cross the bridges, how much of the right side Sco clears and how nobody trips extra wires on the way back. We need to do the same.
-
 RagùneraxeWarlord@necroaxeMember since: 25/11/2017


While the Method positioning is cleaner and seems possible, the tanks have to be able to survive the 5-6 stacks of the Bomb and being pummeled by the Boss. It’ll be a lot of damage on both me and Braggha.
Doing it this way also means that I cannot run the bridge anymore. Can’t run with the stacks from those bombs as I will just die before I even reach the end, and as of right now I can run the bridge entirely and reach the boss without dying.
We can have Rita and Bukav run the bridge instead, but if we want them to clear a path for us entirely then they will most likely have to suicide to clear it for us, which means we lose 1 DPS then another guaranteed and not counting other deaths.
Ultimately, we need to go back to clearing 1 side of the bridge as best we can each time, especially the green ones. Improving positioning can come later and while the Method approach seems much easier, they are also very proactive in avoiding the people with Sleep Canister and making sure they are not next to them before they are dispelled – something we struggled with even on Progress as nobody payed attention to the sleeping people – and also crossing the bridge together and with efficient movement, not allowing the orbs to clip you and deal a ton of damage.
-
FirefunkBlocked@firefunkMember since: 21/12/2017
Method also had 6 x 1M+ hps healers on their kill. I don’t think it applies to us.
I agree it’d be best to clear one side of the bridge each time, i was just thinking clearing most of the green bridge would help to make crossing easier for people with empowered pulse grenades, but if we are disciplined enough, we can manage the crossing with only one clean side, let’s say right + part of the middle to help avoid the big balls of fire.
-
ScabbroxWarlord@scabbroxMember since: 05/11/2017
Yeah, consensus seems to be that you need to get rid of the stasis traps on one whole side as that buggers up the red bridge run if they are still up. Then for red don’t blow trip wires you don’t need to blow by sticking right to one side.
We probably have the DPS to do it more comfortably with 6 healers, the bigger issue being finding that 6th healer without sacrificing both Poko and Dan’s DPS.
That being said, we’d probably still make the check as it’s not tight.
-
 BragghaGuild Member@bragghaMember since: 25/12/2017
People been progressing it with 6 healers yes.
Also popular tactic seems to be tank running it just suicide then get ressed by shaman totem.
You must be logged in to reply to this topic.